Archive for the ‘Uncategorized’ Category

The Domestic, and a Recipe!

Goodness it’s been a long time since I posted!  The whole of my energy for the last several months has been taken up with preparing for family to visit, and preparing for the wedding.  Unfortunately, or perhaps fortunately, the wedding never happened.  My daughter called it off two weeks before, and as we are processing through everything, it is obvious this was the right move to make.  However, there was still all that wedding stuff sitting in bins in my bedroom, and the wedding dress hanging in my closet, and the rental of the all and the limo and the chairs and tables to cancel.  And all that family still came to visit, so there was still housecleaning and keeping up with the day to day of feeding more than just us.  I have had a constant stream of people in my house since before Memorial Day.  I have worked my day job much of that time, and also my side work, in addition to everything else.  And as organized as I am, as pulled together as I am, I was overwhelmed.  The last of the guests left a week ago, and I am finally settling back into something of a “normal.”

Through it all, I was able to use my domestic side so thoroughly that I am not sure why I wasn’t burnt down to a nub.  There was cooking, cleaning, keeping up with the washing of linens, pulling weeds in the garden, picking veggies, keeping the flowers watered, etc.  I am thankful that I had some help along the way.  But I am in my element when doing these things, so there is some measure of happiness and peace there.  In the past 10 days, I started and finished a baby quilt, made a stack of bowl lifters, worked on my sheet rug (oval, because my mom said so), hemmed pants for Klown, made two batches of strawberry jam, cooked up veggies from my garden, kept all of the potted flowers alive, planted some new perennials in the perennial flower bed, hung clothes on the line, and worked on my novel.  And sometimes, I slept. :)

Today, with everyone gone, you would think I’d have taken the day off.  But I don’t know how to do that, so as usual, I was busy.  I made strawberry jam, delivered the baby quilt and some homemade goodies to the new mom across the street, picked apples from our tree, and pulled up a bucket-full of purslaine from my garden (danged weed!!).  And all the laundry got done.  Then I made a really great old-fashioned dinner that I only make about once a year.  It is so good, I don’t know why I don’t do it more often.  Both Klown and I have good memories of similar meals, although I’ve added my own touches over the years.  I wish I’d gotten a chance to make it for my mom when she was here for the wedding-that-never-happened.  I’ll have to be sure I do it when she visits next year!

Pork, Kraut, and Apple

(This is a one-pot meal, and you can do it in the crock pot, but I think it turns out better on the stove. This dish is sweet and tangy, filling, and not too sour.  Bavarian-style kraut is the key.)

  • 2 pounds good, thick-cut pork chops.  You can also use country-style ribs if they are available
  • 2 cans Bavarian-style kraut
  • 3 or 4 medium white potatoes, peeled and diced large
  • 3 apples, peeled, cored, and diced large
  • 1/2 c. apple cider vinegar
  • 2 T. oil
  • salt and pepper to taste

Using a large dutch oven or other type broad-bottomed pot with a lid, brown the pork chops on both sides in the oil.  Season LIGHTLY as kraut is very salty and you shouldn’t need much extra salt.  Once they are brown, add in the apple cider vinegar.

Toss in the potatoes and apples.  Spread on the kraut.  Bring to a boil, then reduce heat to a low simmer.  Cover tightly and cook for 1 hour, or until potatoes and meat are tender.  The apples should pretty much disappear in the cooking process.

Feeds 4-6.


Posted on July 17th, 2016 by Momilies  |  Comments Off on The Domestic, and a Recipe!

I Can’t Drive 55

Here in Colorado, our driver’s licenses renew on our birthdays.  I guess that makes it easy to remember.  We will have been here five years in a few weeks, so it was just short of five years.  After attempting to do my renewal online in April, and failing, I scheduled an appointment with the DMV to get it renewed on my birthday.

It turned out not to be so simple.  When I presented my license to the clerk, I was told I hadn’t had a valid license in more than four years.  It had been suspended.  I’d been driving all this time without a valid license.  How did this all happen?  Well, it was my fault.  But I’m going to place some of the blame on the State of Colorado, as well.

You see, not too long after we moved here, I got a ridiculous ticket for “running a stop sign.”  I didn’t run a stop sign, but the cop was not amused by having to work on a Sunday morning, and was pulling virtually everyone over at a small intersection west of town.  I was on my way back from walking around the Ponds at Pella Crossing, and he was right behind me.  I stopped, counted to three, and turned right.

I could have argued the ticket, I suppose, but I just paid it, because it wasn’t that much money.  I did, however, pay it late.  About three weeks late.  I paid the late fee.  The deal was done, I moved on.

But apparently, in that three week time period, the state of Colorado moved to suspend my license for non-payment of the ticket.  I was never notified of the suspension, so I never knew.  No one caught it.  I’ve renewed license plates on cars twice, I’ve changed insurance companies once, I changed my voter registration three times, and no one caught it.  When I asked the clerk why I wouldn’t have been notified, he asked if I had moved.  No, at the time I got the ticket, and paid for the ticket, and for the next six months after the ticket, I lived in the same place, the same address that is on my license.  But he did tell me “you are not alone.”  I guess this happens frequently.

Anyway, I’m thinking, no big deal, just get it reinstated, we move on.   Well, not so fast, apparently.  Because I had been without a license for so long, I was no longer renewable.  I had to start over.  Like I was 15 again.  Only that was forty years ago.  At the ripe old age of 55, I now need to take the written test to get a permit, then take a driving test.  I have to pass both.  I also have to give them some money, even if I don’t pass.

I wrote a check for $95 (they don’t take cards) to reinstate from the suspension.

Then I write a check for $16.80 so I would be allowed to take the permit test.  The clerk sends me over to the bank of computers where all the 15 year olds are taking their permit tests.  I have to answer at least 20 of 25 questions correctly.  I got to question 8 before I missed one (it tells you as you go).  Then I missed another, and another.  In the end, I got my 20 correct, but only by sheer luck.  Whew.

Sit in line to get my picture taken.  Get my permit.  Now it’s time to drive.  Only they have a four-week wait for driving tests, and I have to go home and make an appointment online.  In the meantime, I’m not legally allowed to drive without a licensed adult in the car.

Huh.  Now what?

Fortunately for me, there are a list of authorized contractors who can conduct driving exams.  The cost is anywhere from $40 to $200 for that privilege. There is one right there in the same plaza with the DMV.  Turns out he was the cheapest, he could take  me right away, but oh yeah, you need cash.  So, I take my illegal self to my car, drive illegally across the street to the ATM to get cash.  He does a quick safety inspection of the car (tail/brake lights, horn, turn signals) and we head out.  The driving test takes about four minutes.  They don’t do parallel parking any more, so I couldn’t get the easy points.  I had to do it the hard way.  I was dinged for not stopping quite right at stop signs, and not looking at side streets as we passed them.  But I passed.

Back to the DMV I went, paid my $25 fee for my full license, and sat in line again waiting to get my picture taken.  Because the can’t just use that permit one they took 30 minutes ago.  Click/flash, and I walked out with a valid license.  Total time elapsed:  2 hours and 40 minutes.

I can now drive 55 again.

I’m pretty surprised, and proud, that I could pass both the written and driving tests some 35-40 years after I last did it.  I was mildly worried, but just tried to stay positive, and I survived it.

But I hope I never have to do that again.  And I’m darned lucky I didn’t get pulled over or have an accident at any point over the last four years.  Very very lucky.

Posted on June 4th, 2016 by Momilies  |  3 Comments »

The Early Gardener

After a relatively mild winter (although we have had plenty of moisture, more than our average), by mid-February, it was obvious that we were going to have an early spring.  By first of March, I was able to walk around in my back yard barefoot without getting cold, which in my mind means the ground is just about warm enough to plant.

In a previous post, I talked about some of what I was doing, and included some pictures.  I added a new raised bed last fall (about 4 foot by 12 food), and added manure to both the existing raised bed and the small garden bed by the back door.  Then I got really crazy and planted seed for kale, peas, lettuce, and radishes.

A month later, I have kale, peas, and lettuce seedlings, although the radishes seem to be a no-show.  I also have herbs starting to show life.  The lemon balm is already looking good (even though it’s supposed to be an annual), the thyme is starting to show new green leaves, and the chives never even died back.  The rosemary still looks like a dried up stick, but the parsley that re-seeded itself is doing great.

This is not to say that we haven’t had some return of winter along the way.  We had 7 inches of snow in mid-March, then another 17 inches of snow on March 23.  What we haven’t had is temps lower than about 24 degrees.  Most of my cold-weather seedlings are in the warmest bed – the one next to the house that gets all the reflected heat from the southern sun.  The snow melts, nice and slow, and all that mineral-rich moisture just soaks in and gives those cold-weather seedlings just what they need.

Having this mild of a late winter/spring is not the norm, at least in the five years I’ve been in Colorado.  Two years ago, it snowed heavily and was bitterly cold every Tuesday into Wednesday in the month of April, and the first Tuesday into Wednesday in May.  It even snowed on Memorial Day that year.  Most of the time, I don’t even think about doing anything outside with the gardens until mid-April.  There’s no point to doing it.  I know I took a big risk this year declaring that spring had come.  But I think I made the right call.  I know it is rather unscientific to judge readiness of the ground and arrival of spring by the feel of the ground under my bare feet, but it seems to work, so why not?

This morning I woke up and it was 58 degrees, and humid.  We are supposed to get rain later, as much as a half-inch.  My seedlings are going to love that, even if the temps are going to drop a bit for the next couple of days (lows in the low 30’s).  I planted beet seed a week ago, and will be putting in turnip and basil seed today, and probably more lettuce seed.  I will start indoor seeds now (squash, mostly).

It feels good to be gardening again.  It is the only thing I miss about winter – no gardening!  And yes, my garden is messy and I have allowed the leaves, leftover straw, and whatever other winter detritus that has come along to remain.  I think it adds to the nutrients already in the soil.  And if you’re paying attention, you will see the rabbit poo sprinkled all over. :)

Lemon balm (left) and my chives, which have been with me for about 10 years now)

Lemon Balm and ChivesThyme.  It is finally starting to show some leaves.  I actually dug it up from its previous location and moved it about a month ago, which I knew was a dangerous act.  But it seems like it is fine! Funny how something that is an “annual” can end up being a perennial after all.

ThymeParsley seedlings.  I let them reseed every year, because they are a biannual, they just keep coming back this way and I never have to actually buy another parsley plant.

Parsley seedlingsKale.

kale seedlingsPeas.

Pea seedlings

Butter Lettuce Seedlings.

Butter lettuce seedlingsApple tree getting ready to bloom.Apple Tree budding outWith spring comes the dandelions.  I fight these things all the time.  Yes, I know about the bee/dandelion thing, but it doesn’t matter.  I’m in an urban area and I need to get rid of them because I don’t need to be spreading them to my garden OR to my neighbors.

spring dandelionA sure sign of spring – daffodils!

DaffodilsBonus if you made it this far… My mother comes to stay with us every summer or fall, for a few weeks.  I love having her here, and she helps with the gardening.  The garden along the side of the house is where I put pole beans on a trellis.  It provides shade for the southern-facing window there.  Her responsibility while she is here, since her bedroom is on the other side of that window, is to pick the beans.  Invariably, some get missed, because pole beans are notoriously known for being able to camouflage beans.  Last summer was no exception, and I guess one of those unpicked bean pods made it to the ground.  We have a volunteer pole bean.  I sent her a picture of it in email, and this was our email exchange:

Me: You missed a bean last summer.  Now look what’s happened!  Any day now, the Giant is going to climb down that thing, looking for Jack.

Mom: Oh Gad! It will pull down the house!

Rogue volunteer pole bean seedling.

Pole bean seedling

Posted on April 10th, 2016 by Momilies  |  Comments Off on The Early Gardener

Spring? Maybe?

I have declared that it is spring.  I can walk around in my back yard with bare feet and not get cold.  Not that we haven’t had winter here.  We definitely have had winter.   The apple tree is showing fat buds on the ends of the branches, the daffodils are up, and the roses are sprouting.  We will have more snow, and rain.  It isn’t over yet.  But the warmth of the ground says a lot, and I’ve been busy starting to gear up for gardening season.  Mother Nature may have other ideas, but my gut says spring is here.  We may get moisture, but we won’t get deep cold.

Two weeks ago I picked up six big bags of alpaca poo, and five big bags of rabbit poo from local animal-raisers. Not free, but reasonably priced. With the new raised bed I had my future son-in-law build last fall, I have one more space that needs to be filled.  That bed, 4 foot by 12 feet, was initially filled with leaves from our yard, and some leftover Halloween decorations (pumpkins, gourds, and corn stalks).  I laid down some newspaper on top of all that stuff, and then managed to put about six inches of alpaca manure on top.  The rabbit manure ended up in the two other garden beds – one is raised and on its second season, the other is the small bed near the house, which I’ve used as-is for the last two years without amendments. That first raised bed gave me lots of eggplant last year, as well as a pumpkin and a lot of cucumbers and squash, and it was only filled with leaves, some raw compost (kitchen scraps), and six inches of bunny poo.  I’m hoping for the same results from the new raised bed.

RocksToday, I dug out the edges of that smaller garden (it is about 3 foot by 12 foot) and put in scalloped concrete edging.  The intent was to be able to put a bit more dirt/compost/poo in there so it could fill up, and amend the existing soil.  This actually took me less time than I thought it would, not counting the repair I had to do when I poked the digging fork right through the sprinkler line that goes to the back yard.  Yeah, I’m bright like that.  But overall, laying the edging and backfilling in everything took less than two hours. Like all good Colorado gardeners, I spent plenty of time picking rocks out of the dirt I was digging up.  We grow great rocks here, apparently.

Then I got really brave, and planted kale, two kinds of lettuce, mache, and radishes (all seed) in the sunniest end of that garden.  Last year I grew kohlrabi and green beans in that spot.  I also planted peas along the trellises I usually use for pole beans.  They’ll be done and gone before I need to put in beans.  I also relocated the thyme and rosemary, both of which have survived the winter.  The lemon balm also appeared to survive the winter, which is surprising.  I placed it all closer to the door, where the chives are.  I’ll put in some nasturtium seeds along that edge, and that area will be the herb garden.  I’ll add basil and parsley once the weather is truly warm, which is still months away.

As the weather warms, I’ll add more things.  I have room for cabbages and kohlrabi, which can go out in a few weeks as well.  Squash, tomatoes, beans, and eggplant will have to wait until late May.  And unless we get some rain or snow, the seed I put down today will be slow to germinate.  But that’s okay.  They’ll come up eventually.  I’ll be prepared with row cover and plastic if needed.  One of these days, I’ll get ambitious and build the hoop structure for that area, so I can guarantee an early harvest.  I’ve seen several hoop houses go up around town in the last few weeks.

It felt good to get out there and work the dirt, and to put seeds in the ground.  The last month or so I’ve been itching to be back out there doing stuff.  I’ve had my winter to laze around.  Time to get back to work!

Daffodiles (left), roses starting to bud out (right).

DaffodilsRoses are budding


The second-year raised bed.  It’s full of bunny poo!  You can see my compost basket at the end, and the pot that holds the mint.  This bed is about 3 feet by 16 feet.

Raised bedThe new raised bed, about 4 feet by 12 feet.  Doesn’t it look like its just ready and waiting for something to be planted in it?  Most of it is still in shade form the neighbor’s pine tree, so this will only be used for hot-weather veggies.

The newest raised bedThe original bed, with the new concrete edging.  Yes, I know it is a bit curvy, but it follows the sidewalk, which is not straight! Notice the trellises right next to the window.  These hold pole beans in the summer and provide great shade for that window.

New edging

New concrete edging


Hard to see the herbs, but the chives are the green clump, to the left of them is the rosemary, and the thyme is in the front.  The lemon balm is still under a pile of leaves.

Herb space

Each of the sticks is a row of seeds.  from left to right – radishes, mache, black-seeded simpson (lettuce), butter lettuce, and two rows of curly blue kale.

Spring planting


Posted on March 5th, 2016 by Momilies  |  1 Comment »

Epic Rag Rugging

Rug at medium size

(Note:  If you click the pictures, they will show their larger form)

A few weeks ago, I stumbled across a tutorial and some videos for making enormous, chunky, rustic rag rugs from sheets.  I’ve seen crocheted rag rugs for years, and was never really impressed all that much with them.  They looked scrappy (not in a good way), ravelly, and the stitches weren’t pretty.  I realize, they were just rugs, and you were going to stomp muddy feet all over them, but still.  I like things to look nice.

The rug in this woman’s tutorial was scrappy, but in a good way, and she was using a large crochet hook and loose stitches, which allowed the beauty of the stitches to show.  And I decided I could go one better, create a neatly-created project with colors that made sense and went together, and with stitches you could see easily, and therefore, appreciate the beauty of.  After having almost completed the first one, I can say I’m hooked.  Yes, bad pun. :)  This rug is super-chunky, thick, and comes together really fast.  And it is the most cushy, comfortable rug under your feet.  I’m just thrilled with how it has turned out.  And when I say fast, I mean fast.  I prepared strips, and crocheted a 40″ diameter rug in about 4 hours.

I’m going to include links to Flight of the Pooka’s little videos at the end of this post.  I encourage you to watch them if you are a visual learner.  Seeing is sometimes better than reading a description.  But I’m going to give it my best attempt, with pictures.

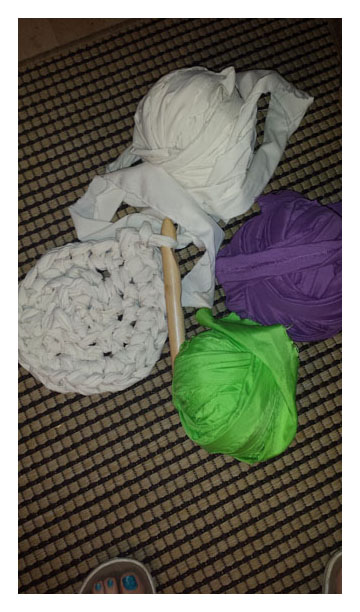
First, you need a lot of sheets.  I started with six flat and fitted sheets I got at the thrift store.  I tried to think about what colors would go together.  I ended up with cream, a pretty blue/green/white stripe, a pale grass green, white with purple and green polkadots, and a dark purple.  The sheets with patterns actually look great when crocheted into a rug, and you can build off the colors in the color scheme of the print pattern.  I will say that even though I used all six sheets, the rug isn’t as big as I want, so I’m keeping my eyes peeled for sheets that will help me finish the project.  In the meantime, I’m using other sheets to start new rugs.  Also, use cotton or cotton blend WOVEN sheets.  Not jersey and not satin or other silkies.  Not that there is anything wrong with those, but if you’re going to make a rug using this method, you want woven.

Sheet balls and small rugI did figure out pretty early on that if the sheets weren’t queen or king size, they weren’t worth tearing up into strips.  You just don’t get much out of a twin or full sheet.  I used both flat and fitted, and I tore them, rather than to waste time cutting.  I’m lazy like that.  Flight of the Pook shows how to tear the sheets quickly and easily, and it’s in her first video.  In my case, I went a couple steps further than she did.  I cut/tore off the hems of the sheets before I started, because I didn’t want the bulk of them messing up the look of my rug.  But like her, I did the tearing while sitting in my comfortable chair, so nothing fancy was required in the way of seating or a table or anything.  I snipped the top of the sheet about 3 inches from the edge, then tore the strip to the other end, stopping about an inch before I reached he bottom.  I then snipped another 3 inches over on that bottom edge, and started tearing toward the top, again stopping about an inch before I got to the top.  I continued this pattern until the whole sheet was torn into one long strip.  Yes, it means there is some weirdness where you make that turn, but in crocheting, I found that it really didn’t matter, it came right into the stitches and didn’t show.  The Flight of the Pook’s tutorial shows wrapping the sheet strips into a ball, but I found that thisBasket of sheet strips 
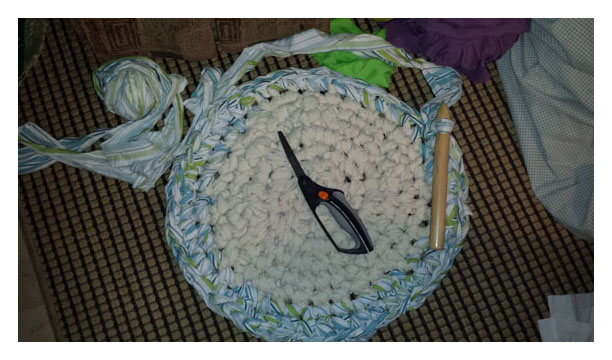
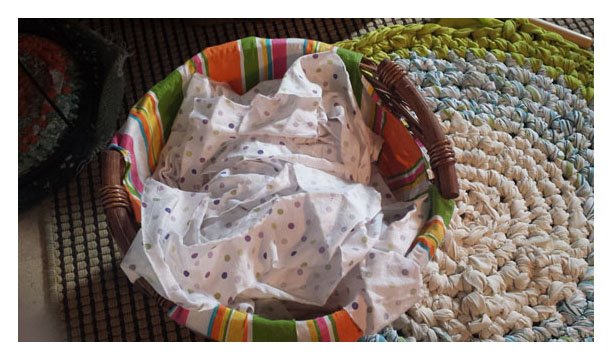
was not only an unnecessary step, but made crocheting with the printed sheets more difficult.  In a ball, the sheets came off twisted like yarn, instead of flat, and the print usually ended up inside out, so it wouldn’t show on the rug.  So I just tore the strips directly into a big basket.  That way I could manipulate the strips to keep them mostly flat, and not twisted, as I went.   I wanted those big stitches, and twisted sheets make smaller stitches.

Giant crochet hook
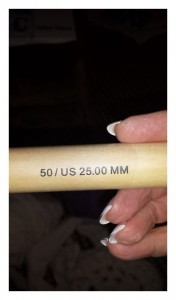
I used my largest crochet hook.  I bought it more than a year ago because I was fascinated with its size.  I had no purpose for it, but bought it anyway.  And there it was, just waiting for me to use it on this project!  It is not classified with a letter designation, like regular hooks.  The biggest letter hook I have is, I think, a Q, and I use that one all the time.  And I think that’s the size hook that most of the rug tutorials suggest you use.  Flight of the Pook uses a Q.  But I wanted to go bigger.  Way bigger.  So, 25 mm it is!  This thing is as big around as a quarter.  I have large hands, so handling it is not really a problem.  I like the smooth wood of it, and can grab it in a fist to pull it through a stitch even if the stitch is a little too tight and reluctant.  The only way to manipulate a hook like this is by fist, not like a pencil the way you were taught with regular crochet hooks.  Using a big hook like this means that every row of stitches is about 1.5 inches deep.  This is why the rug builds so fast – the stitches are huge.

To start the crochet, chain 6.  Chain LOOSELY.  Loose is important, because sheets, unlike yarn, do NOT stretch.  If your stitches are too tight, you’ll not only not be able to pull the strips through each stitch, you will find your arms very very sore.  Once you have chained 6, slip stitch them together in a loop (pull the slip stitch through the last and the first chain).  From this point on, leave the tail (back) facing away from you, so you get the best look on the “front” of the rug.  Start single crochet stitches in your chain stitches.  You may want to do two single crochet stitches in each chain, to build the circle bigger.

Rug stitches in the beginning
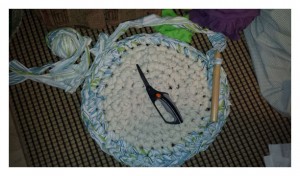
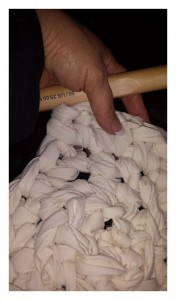
Continue crocheting around the circle.  It will start to look like a rug after about four or five rows, and you will have a better feel for how many “extra” stitches you will need to keep it getting larger without curling up like a bowl, or floppy with a ruffle around the edge.  The goal is smooth, flat, and round.  I am not good at crocheting circles, and found myself with a “ruffle” and had to take out four rows and try again (see picture below).  The picture to the left shows some of those early stitches.  It doesn’t look all that pretty at that stage, but keep with it, and you will do fine.  And you can always rip it out and go back if it isn’t quite right.  And like I said, this went fast.  I had a 15 inch circle in an hour.

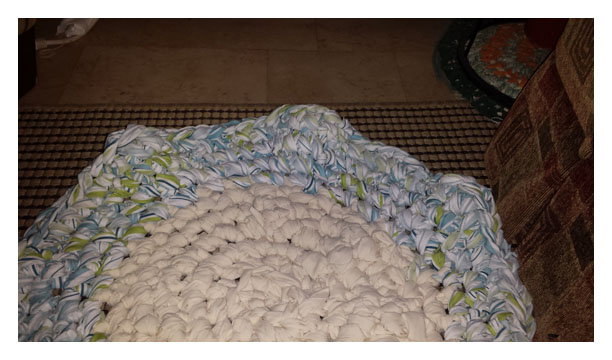
Ruffly rug – had to rip it back about four rows and re-start).

rugrufflededgesI crocheted until I ran out of sheet, then tore more sheet, tied a very tight square knot to the old sheet, and kept going.  Every time I had to tie a knot, I tucked that knot Rug at medium sizeto the back, so it wouldn’t be on the top.  As the rug got bigger, I needed fewer and fewer extra stitches.  At its largest, I was adding an extra stitch about every 7th or 8th stitch.  This means I put two single crochets in one “V” from the previous row.  This seemed to work well.  As you go, you’ll notice it getting ruffly, or the edge curling up toward you, and that means you need to rip back a few stitches and add an extra or skip a stitch to keep it smooth.

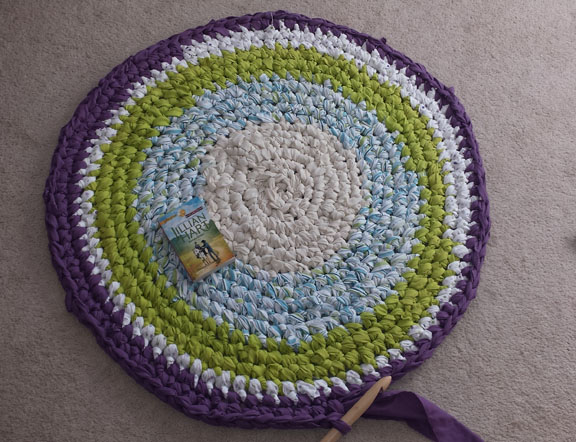
The picture below shows the rug at 40 inches, but I’ve run out of purple.  This will be a problem for me as I go forward making more rugs.  The purple sheet was a double size, and you can see as you get to the outside, you don’t get as many rows of a particular color because of not really having enough sheet.  I’m contemplating taking out the purple and choosing something else, since it looks rather odd the way it is, and I’m not sure that odd look would go away even if I just kept going with another color.  Still deciding, but whatever I decide, it will be a king-sized sheet that gets used!  (The paperback is on the rug to give you perspective on size.)

rug almost finishedI am loving this project, and have sheets torn for two more large rugs.  I’ll be working on one of them while watching football this afternoon.  Go Broncos!

P.S. I said not to use Jersey or knit sheets.  This isn’t strictly true, they can be used.  A friend of mine gave me a big box of Jersey sheets, and I will make rugs from them, too, but you cannot tear them, so more time will be spent cutting them into strips for use.  I would not mix jersey with woven in the same rug, however.

Links to Flight of the Pook’s video tutorials, and her original blog on the topic:

Flight of the Pook blog post

Flight of the Pook Video 1 (sheet tearing and getting started)

Flight of the Pook Video 2 (the rug is growing)

Flight of the Pook Video 3 (the big finish!)


Posted on January 24th, 2016 by Momilies  |  2 Comments »

Susabelle’s Nine Blossom Steak Chili

I had a request for this recipe from a friend on facebook, and that’s when I realized I’d never posted this one.  This is a great, flavorful way to have chili.  Not that thick, gloopy stuff that makes you feel like a bloated buffalo within ten minutes of finishing it.  It is more like a soup, with lots of different flavors melded together.  As with most chilis and soups, it tastes much better the second day, so if you can cook it one day, and serve it the next, you will be a lot happier with it.  All measurements are approximate, and you can size this recipe up and down as needed for the size of your eating crew.  The recipe below will serve about 10 people, give or take. The “Nine Blossom” in the title of this chili refer to the nine blooming things that are in the ingredient list – all of the spices including the cocoa. :)

Susabelle’s Nine Blossom Steak Chili

1 pound steak, any kind, cut into small pieces (1/2 inch or smaller) (You can use ground beef/elk/bison if you like)

1 large white or yellow onion, chopped

1 sweet red pepper, seeded and chopped

1 sweet yellow or orange pepper, seeded and chopped

2 T. olive oil

1 t. minced garlic, or 1 T. garlic powder

1 can canelloni or white navy beans

1 can red kidney beans, drained

1 can black beans, drained

1 can pinto beans, drained

1 can (smaller) chili hot beans (do not drain)

2 14 oz. cans diced tomatoes (do not drain)

1/2 t. cumin

2 T. chili powder

red pepper flakes to taste (or use hot sauce, or add a chile/jalapeno/ghost pepper of your choice)

Salt and pepper to taste

3 T. cocoa powder

In a large, heavy pot (don’t use a flimsy pot for this), brown the steak, onion, and peppers in olive oil until vegetables are tender.  Add in the garlic (if using fresh) and sautee for one minute.  Add in all remaining ingredients except the cocoa powder.  Bring to a boil, then reduce to simmer and cook for at least two hours.  Stir every once in a while.  If chili becomes dry or too thick, add hot water or warmed plain tomato juice (cold will lower the cooking temperature so try not to do that to keep this cooking consistently).  This should not ever look thick or gloopy; it should be more like a stew-type soup.  Everything should move around fairly freely in the broth.  Add in the cocoa powder, and taste for spice level.  Adjust as needed.  Do not overspice, as the spices become more concentrated as the chili progresses.  Cook for an additional hour before serving.

Serve this with toppings like scallions, shredded sharp cheddar cheese, sour cream, oyster crackers, etc.  This will taste better if it can refrigerate overnight and be reheated the next day.

Enjoy!


Posted on January 17th, 2016 by Momilies  |  1 Comment »

The Giving Up, The Getting Back

Fifteen months ago, I gave up all caffeine but my morning coffee.  It was supposed to help my sleep, help me get off the sleep meds I take every night in order to get a mere five hours of sleep.  If I was lucky, I was getting that.  Many nights it was closer to 4. It was also supposed to help me lose weight.

I gave up eating processed foods three years ago.  No HFCS, cooking everything from scratch when I could, reading labels on the things I still used as shortcuts.  This was supposed to reduce the inflammation in my joints, and help me lose weight.

I gave up canned vegetables, except for tomatoes or things I canned myself.  I cook either fresh or frozen veggies, or eat them raw.  This was supposed to give me better nutrition, and help me lose weight.

I gave up margarine and and other weird fats (like “canola” oil).  We ate real butter, and I used olive oil to cook almost everything.  This was supposed to give me some artery-cleaning and help me lose weight.

I gave up “instant” foods like store-bought cookies, minute rice, white long-grain rice, noodles/rice and sauce mixes, canned cream of whatever soups, frozen dinners or family meals, and canned soups.  Instead I cook real meat that I bread myself if I want, make my own pasta sauce, use a hand-made mix for making a cream of whatever soup, and buy nothing that is fully prepared just waiting for me to cook it.  I know what all the ingredients are and there are no crazy preservatives or chemicals that I can’t pronounce.  This was to get the junk out of my body, and make it easier for me to lose weight.

I started eating salad for lunch almost every day.  I make the salad myself from real lettuce (not iceberg), cucumbers, tomatoes, and sometimes half an avocado.  I switched from big name-brand dressings to dressings I made myself from whole ingredients, or carefully read labels of the dressings I bought, which were most often vinaigrette or at least non-creamy.  No nasty ingredients are allowed on my salads.  This was to help keep my bowels running nicely, and to help me lose weight.

I took up bike riding and Zumba.  I grunted through the exercises, groaned as I peddled my oversized body up hills.  This was supposed to give me better heart function, stronger knees, and, again, help me lose weight.

My knees are better than they’ve ever been.  I climb stairs like a teenager.  I don’t fatigue easily, and I feel better overall.  There aren’t too many chores I’m not willing to take on – digging in the garden, toting things around, mowing the grass, etc.  I feel well enough to do all of that.  I don’t miss oreos, cheap ice cream, McDonald’s, ten-minute Lipton Noodles and Sauce, etc.  I’m happy that I feel better, and I like to cook, so having to take extra effort to cook doesn’t bother me.

But I have not lost a single pound.  Not one.  I am no thinner.  I am no less heavy.  Eating all the right things, I should be 12 pounds.  Maybe 14 pounds accounting for my height. :)  But no.  I’m still at my over-300-p0und mark, and no matter what I’ve done, this does not change.

I feel like I was sold a bill of goods.  I do know people that have lost weight and kept it off, but those people seem rare indeed.  Does weight matter?  If I’m feeling better and eating the right things and have no obvious health problems, then am I okay anyway?  My brain says no.  My brain says I need to lose weight.  My brain says I will never make it to retirement unless I do.

But how do I make this happen?  I don’t want to be thin.  I have no desire to be thin.  But I’d like to be 50 pounds lighter.  How the heck do I get there?  I’m already doing all the right things, according to the experts.  This is an ongoing frustration for me.

This has been a long winter.  It promises to keep being what it is this year – cold with a lot of precipitation.  I haven’t been able to bike.  My schedule doesn’t allow my Zumba classes.  And all this combines to make me feel worse about myself, even though I feel fine, and there has been no change in my physical appearance or ability to do what I want to do.

Ugh.  I always feel fattest in winter.  At least all the cookies I made for Christmas are now gone.  Such a temptation having those around!

Posted on January 17th, 2016 by Momilies  |  1 Comment »

New Year’s Paella

In some cultures, there are foods that are traditional for New Year’s.  Cajuns like their Jambalaya, for example.  Hoppin’ John for Southerners.  Shrimp for East Coasters.  I’ve tried a lot of things, but I think I’ve found my new favorite.  I have always felt that you should eat an abundance on New Year’s.  It is the day that sets the tone for the rest of the year.  Eating in abundance will guarantee my family won’t go hungry in the coming year.  Or something.  Or maybe I just like eating!

Anyway, I adapted a Paella recipe I found online, giving it the Momilies touch, and boy, was it good. This recipe is adaptable, and can be spiced or not, as you like.  This is a Cuban dish, so spicy is actually not what you want, although you do want it to have flavor and a little zing.  My recommendations for more spice, if you want it, is to use chorizo instead of smoked sausage, and add more red pepper flakes to the rice.  A dash of hot sauce on the completed dish can help too.  We like ours mild, so I stuck with the amounts listed below.

You will need two large skillets, one needs a tight-fitting lid.  A paella pan is fine if you have one, but most of us don’t.

I hope you’ll feel inclined to try the recipe, and then leave me a comment or two about how you liked it!

New Year’s Paella (feeds 5-6)

Ingredients:

2 chicken thighs, deboned (I buy boneless because I’m lazy)

2 thick-cut but small pork chops, boned (I buy boneless because, lazy)

1/2 pound raw shrimp, peeled and deveined (I buy it already peeled and deveined…)

1/2 package of polksa kielbasa, sliced (use all beef)

1/2 Spanish or sweet yellow or white onion, diced

1 red sweet pepper, diced

1 T. paprika (smoked is great if you have it)

2 t. oregano

2 garlic cloves, crushed

1 c. rice (short-grained works best, but use what you have)

1 bay leaf

zest of one lemon

1 can/bottle beer (any kind, lager is best)

water

saffron

olive oil

red pepper flakes

salt and pepper

Directions:

Chop vegetables and set aside separately (they will be used at different times in the recipe).  Chop the sausage and set aside.  If using Chorizo, remove skin and crumble for cooking later.  Rinse the shrimp and set aside.  Chop the chicken and pork into chunks no bigger than 1″, and place into a large metal or glass bowl.  The smaller they are, the faster they will cook.  Toss the chicken and pork with the paprika, oregano, and about 2 T. olive oil.  Set aside.

In a large skillet with a tight-fitting lid, heat 1 T. olive oil on high heat.  Add in the garlic and rice, and toast (stirring often) for about 3 minutes.  Add in the bay leaf, beer, a pinch or two of red pepper flakes, a few saffron threads, and about 1/2 cup water.  Salt and pepper to taste.  Bring to a boil, then turn the heat to low and put the lid on.  Cook for about 20 minutes, or until rice is done but not mushy.

When rice is about halfway done, heat 1 T. olive oil in a large skillet.  Add in the chicken/pork mixture, onions, and salt and pepper.  Cook, stirring frequently, for 5-7 minutes or until meat is almost done.  Add in the sausage and sweet pepper and cook another 5 minutes.

Remove the rice from the heat when it is done, and sprinkle on the parsley and lemon zest.  Keep it covered to  maintain the heat.

Check the chicken and pork to see that they are done.  Do NOT overcook or your meat will be tough.  Toss in the shrimp and cook for 1-2 minutes or until they turn pink.  Again, do NOT overcook!

Traditionally, this is served on a big platter.  The rice is spread on the platter, and the meat mixutre put on top.  We serve it separately, putting rice on our plates, then the meat mixture on top.  Do what you like.  You can also squeeze a wedge of lemon over the top of it all for a bit more zing.

Enjoy!

Download a PDF version of this recipe here!

Posted on January 1st, 2016 by Momilies  |  1 Comment »

Merry Christmas!

As we head into the last two weeks of the year, I just wanted to do a quick post to wish you the best of the holiday season.  It is always a mixed bag – we miss those who have passed, sad nostalgic memories sometimes making it difficult to see the happy, but then happy new memories and old memories make everything sparkly and warm.  Here is a list of my favorite things, and things I wish for you for your holiday:

  • sweet sugar cookies, crunchy peanut butter cookies, creamy fudge, and sugared pecans.
  • a warm bed with soft pillows and comforting quilts and a long night of sleep to go with it.
  • A nice salty ham with pineapple rings and maraschino cherries and plenty of cloves.
  • A little snow to brighten your Christmas, but not so much that you can’t go to church, to visit family, etc.
  • Bright Christmas lights that sparkle on your tree, real or artificial, and ornaments that have meaning.
  • Hot coffee with chocolate and peppermint, and a savory breakfast to enjoy it with.
  • Peppermint sticks, ribbon candy, Whitman’s chocolates, and M&Ms.
  • Presents that are practical, and some presents that are fun, wrapped in cheerful, bright wrapping paper with shiny bows.
  • A good book or two, or a gift certificate to the nearest bookstore.
  • Friendly, happy family and friends to spend the day with.
  • Eggnog.
  • A tangerine in the toe of your stocking.
  • Health.
  • Happiness.
  • Laughter.

Happy Holidays.  Merry Yule.  Happy Winter Solstice.  Happy Saturnalia.  Merry Christmas. Whatever you celebrate, I wish you joy.

Posted on December 20th, 2015 by Momilies  |  Comments Off on Merry Christmas!

When Memories Leak Out of My Eyes

Sometimes memories sneak out of my eyes and roll down my cheeksI don’t know if it is an effect of getting older, or just the weird case of the sads that I have been going through for a few months, but the memories sneak up on me and leak out of my eyes.  I’ve had a few incidents over the last few months.

Not to say that it is a bad thing, because it certainly isn’t.  I’m happy to have memories that bring back such small feelings.  And those memories are usually jogged by my seeing something, smelling something, or hearing something (like a piece of music).  And I suppose as I get older, these things will happen more often, as bits of my childhood get further and further away.

When my mother visited a couple months ago, she brought things to pass to me.  This happens every year, but the older she gets, the bigger the pile of passed on things get.  This year it was linens, costume jewelry, pictures, and souvenirs that belonged to my grandmother.  And it also included something from my own childhood, that I had nearly forgotten about.  And my mom, for whatever reason, didn’t hand it to me directly.  She put it in a box with a tea set she wanted me to have, and I didn’t open that box until she’d been gone more than a month. I didn’t even notice the styrofoam box under my desk for weeks.  When I pulled it out to see what she’d accidentally left behind…

Kewpie dollKewpie.  I hugged her tiny body to my face and cried.  I couldn’t help it.  I’m sitting here teary right now just writing this.  I don’t remember when I got her, or where she came from originally, although in my mind she is strongly associated with my grandmother.  My mother will have to clear up the details on Kewpie for me, because I just don’t remember.  I do know that I’ve had Kewpie my whole life, as far as I can remember.

Kewpie is a peculiar set of dolls and figurines created by Rose O’Neill, a Missouri artist, beginning in 1912.  By the 1920’s, the dolls were being made in cellulose, then came rubber, and other composite materials.  I am not sure what mine is made of, but she is soft (you can squish her a bit) and the rubbery coating is a bit sticky with age.  She has some dirty marks on her that won’t come off, and she shows some wear, but is in pretty good shape for a doll I suppose was made in the 50’s or 60’s. My Kewpie is about 9 inches tall, but Kewpies came in lots of sizes, some smaller than mine, and many bigger.

Most Kewpies came sans clothing, and the outfit she wears in my memories was made from some scraps of fabric from a dress my mother made me when I was little.  I hated that dress, for whatever reason.  It was a pretty peach pastel plaid with gold thread, had criss-cross straps, and lots of lace.  I hated that dress, I just don’t remember why.  Maybe it was itchy.  I was probably 4 or so when I had that dress.  But I liked the little pantsuit made from scraps that Kewpie wore.  I remember, maybe incorrectly, that my grandmother made the little pantsuit for Kewpie.  I don’t know what happened to that original outfit, but a few years ago (probably almost 20 years ago now), my mother made her a new outfit, the one you see in the picture.  That fabric is left from quilt scraps, from my mother making me a quilt.  And see the little pocket?  It holds a penny.  Any time my mom makes a little dress for a doll, it gets a penny-pocket.  Even dollies need mad money!

Doll high chairAnd then there was this.  Tater and I were out trolling the thrift shops, like we like to do on any given Saturday.  At one of my favorite ones was this doll high chair.  I don’t know why it made me cry, except it is in my memories somewhere, too.  I either had one when I was a child, or maybe my cousins had one (we spent a lot of time with them when I was young).  I am not sure.  The memory is really non-specific, but every detail seemed to trigger my feelings.  The little tray that would lift up so I could put the dolly in, the very 60’s fabric on the cushions, all of it.  Of course, it’s a miniature version of the type of high chairs that were being used when I was a small one, back in the early 60’s, so that may be all there is to that memory.  But still, it made me smile, and it made me cry.  Kind of silly for a grown woman to lose her face in a thrift store, and not even be able to articulate clearly why.

But really, the memories are great to have.  And I wouldn’t have it any other way.  Maybe it’s time for me to go through my keepsake trunk again, and remind myself of what is there.  I haven’t done that in a long time.  Might have to pick up a box of Puffs before I do that, though.

(P.S. If you ever get to Branson, Missouri, take a short side trip to the Ralph Foster Museum at the College of the Ozarks.  Their museum (admission is very cheap) has a wonderful collection of Kewpie dolls and memorabilia, and a tribute to Rose O’Neill, who died in poverty after creating one of the most iconic dolls of the 20th century.)

Posted on December 13th, 2015 by Momilies  |  Comments Off on When Memories Leak Out of My Eyes